Wednesday, November 25, 2020

Basic SNMP for HomeAssistant

I have a lovely OKI MB480 printer. It's been reliable for 10 years. And I want to display it's status in HomeAssistant.

Like this...


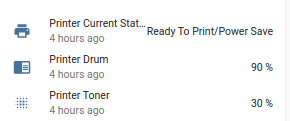
The printer speaks SNMP and Home Assistant has an SNMP Sensor, so let's learn some SNMP and find a way to make the two talk to each other.

SNMP keeps it's overhead low by not transmitting a lot of information. What is transmitted is compressed by encoding. Here's an example:

$ snmpget -v 1 -c public 10.10.10.3 .1.3.6.1.4.1.2001.1.1.1.1.2.20.0
iso.3.6.1.4.1.2001.1.1.1.1.2.20.0 = STRING: "Ready To Print/Power Save"

Each of those numbers has meaning, so you need to know exactly what to ask for. Also, there is a client-server (manager-agent) arrangement to figure out (and install), three different versions of SNMP, and finally migrating a successful query into a Home Assistant format.


How to ask SNMP a question

The printer has a built in SNMP agent (server). Let's install an SNMP manager (client) on my laptop.

$ sudo apt install snmp

Now we can make two simple queries: walk (return a whole tree) and get (return one item). the tree may be quite lengthy -- on this printer, it's 1900 lines.

$snmpwalk 10.10.10.3
snmpwalk: No securityName specified

Oops, we are missing two more elements:

  • A version number. We're going to stick with version 1, the easiest.
  • A community name. This is somewhat like a username; it defines access. Communities get replaced by real usernames and passwords in version 3. The most common community name is "public"

These are defined by the remote agent (server). For example, the printer supports v1 and v3, but not v2.

$ snmpget -v 1 -c public 10.10.10.3 .1.3.6.1.2.1.1.5.0
iso.3.6.1.2.1.1.5.0 = STRING: "OKI-MB480-224E59"

$ snmpwalk -v 1 -v public 10.10.10.3 > walkfile     // Use redirection for lengthy output


Finding the right question to ask

Now that we have connectivity, we need a dictionary to understand all those number encodings. That dictionary is called a MIB file. It's a structured text file that defines all of the numbers and positions and response codes.

  1. The SNMP package that we installed has MIBs disabled by default. Enable them.
    • Edit the /etc/snmp.conf file
    • Comment out the "mib:" line

  2. Install the package of standard MIB files.
       sudo apt install snmp-mibs-downloader

The MIB for my printer wasn't in the package. I foind it online, downloaded it, and stored it in /home/$ME/.snmp/mibs/. The snmp command automatically looks for MIBs there, too.

Here's the same query using the proper MIB as a dictionary:

$ snmpget -v 1 -c public -m OKIDATA-MIB 10.10.10.3 sysName.0
SNMPv2-MIB::sysName.0 = STRING: OKI-MB480-224E59

$ snmpget -v 1 -c public -m OKIDATA-MIB -O n 10.10.10.3 sysName.0    // '-O' formats output. 'n'=numeric
.1.3.6.1.2.1.1.5.0 = STRING: OKI-MB480-224E59

So now it's a matter of using snmpwalk to locate the fields that I want to ask for. I chose three fields:

  • Current Status: OKIDATA-MIB::stLcdMessage.0
  • Drum Usage: OKIDATA-MIB::usageDrumCurrentLevel.1
  • Toner Percent Remaining: OKIDATA-MIB::usageTonerCurrentLevel.1

Obtain the correspiding numeric code (called an OID) for each field using the -On flag, and test the OID without the MIB.

$ snmpget -v 1 -m OKIDATA-MIB -c public -O n 10.10.10.3 usageDrumCurrentLevel.1
.1.3.6.1.4.1.2001.1.1.1.1.100.4.1.1.3.1 = STRING: "2298"

$ snmpget -v 1 -c public 10.10.10.3 .1.3.6.1.4.1.2001.1.1.1.1.100.4.1.1.3.1
SNMPv2-SMI::enterprises.2001.1.1.1.1.100.4.1.1.3.1 = STRING: "2298"


Migrating a successful query into Home Assistant

Here's what the same SNMP query looks like in a Home Assistant config:

Sensor:
  - platform: snmp
    version: 1                # Optional: Default is 1
    community: public         # Optional: Default is public
    host: 10.10.10.3
    baseoid: .1.3.6.1.4.1.2001.1.1.1.1.100.4.1.1.3.1
    name: Printer Drum Remaining
    unit_of_measurement: '%'
    # A drum lasts about 25,000 impressions. Convert usage to a percentage of 25,000
    value_template: '{{ 100 - ((value | int) / 250.00 )) | int}}'

Sunday, August 16, 2020

Installing Home Assistant Core in an LXD Container (Part 2)

Last time, we built a basic LXD container, and then build HomeAssistant inside.

This time, we're going to add a few more elements.

  • We're going to do all the steps on the Host instead of diving inside the container. So we're going to use lxc exec and lxc push. The goal is to make spinning up a new container scriptable
  • We're going to start/stop the HomeAssistant application using a systemd service
  • We're going to keep the data and config outside the container and use an lxd disk device to mount the data. Even if we destroy the container, the data and config survive to be mounted another day.

Preparing LXD

We're going to skip LXD initialization in this example. There's one addition from last time: We're going to add shiftfs, which permits us to chown mounted data. The macvlan profile and shiftfs enablement are persistent -- if you already have them, you don't need to redo them. All of these commands occur on the Host (we have not created the container yet!)

   # Create a macvlan profile, so the container will get it's IP Address from
   # the router instead of the host. This works on ethernet, but often not on wifi 
   ip route show default 0.0.0.0/0
   lxc profile copy default lanprofile
   lxc profile device set lanprofile eth0 nictype macvlan
   lxc profile device set lanprofile eth0 parent enp3s5

   # Test that macvlan networking is set up
   lxc profile show lanprofile
     config: {}
     description: Default LXD profile  // Copied. Not really the default
     devices:
       eth0:                           // Name, not real device
         nictype: macvlan              // Correct network type
         parent: enp3s5                // Correct real device
         type: nic

   # Enable shiftfs in LXD so data mounts work properly
   sudo snap set lxd shiftfs.enable=true
   sudo systemctl reload snap.lxd.daemon

   # Test that shiftfs is enabled:
   Host$ lxc info | grep shiftfs
    shiftfs: "true"

Create the Container and Initial Configuration

If LXD is already set up, then start here. We will mount the external data location, set the timezone and do all that apt setup. But this time, we will do all the commands on the Host instead of inside the container. We will also create the sources.list file on the host and push it into the container.

   # Create the container named "ha"
   lxc launch -p lanprofile ubuntu:focal ha

   # Mount the existing HomeAssistant data directory
   # Skip on the first run, since there won't be anything to mount
   # Shiftfs is needed, else the mounted data is owned by nobody:nogroup
   # Chown is needed because shiftfs changes the owner to 'ubuntu'
   lxc config device add ha data_mount disk source=/somewhere/else/.homeassistant path=/root/ha_data
   lxc config device set ha data_mount shift=true
   lxc exec ha -- chown -R root:root /root

   # Set the timezone non-interactively
   lxc exec ha -- ln -fs /usr/share/zoneinfo/US/Central /etc/localtime
   lxc exec ha -- dpkg-reconfigure -f noninteractive tzdata

   # Reduce apt sources to Main and Universe only
   # Create the new sources.list file on the host in /tmp
   # Paste all of these lines at once into the Host terminal
   cat <<EOF > /tmp/container-sources.list
   deb http://us.archive.ubuntu.com/ubuntu/ focal main universe
   deb http://us.archive.ubuntu.com/ubuntu/ focal-updates main universe
   deb http://security.ubuntu.com/ubuntu focal-security main universe
   EOF

   # Push the file into the container
   lxc file push /tmp/container-sources.list ha/etc/apt/sources.list

   # Apt removals and additions
   lxc exec ha -- apt autoremove openssh-server
   lxc exec ha -- apt update
   lxc exec ha -- apt upgrade
   lxc exec ha -- apt install python3-pip python3-venv

Create the Venv, Build HomeAssistant, and Test

This method is simpler than all that mucking around activating and venv and paying attention to your prompt. All these command are issued on the Host. You don't need a container shell prompt.

   # Setup the homeassistant venv in a dir called 'ha_system'
   #We will use the root account since it's an unprivileged container.
   lxc exec ha -- python3 -m venv --system-site-packages /root/ha_system

   # Build and install HomeAssistant
   lxc exec ha -- /root/ha_system/bin/pip3 install homeassistant

   # Learn the container's IP address. Need this for the web browser. 
   lxc list | grep ha

   # Run HomeAssistant
   lxc exec ha -- /root/ha_system/bin/hass -c "/root/ha_data"

   # Use your browser to open the the IP address:8123
   # HA takes a couple minutes to start up. Be patient.
   # Stop the server from within the Web UI or ^C to exit when done.

Start HomeAssistant at Boot (Container Startup)

The right way to do autostart is a systemd service file on the container. Like with the sources.list file, we will create it on the host, then push it into the container, then enable it. There's one optional ExecPreStart line - it will slow each startup slightly while it checks for and installs updates.

   cat <<EOF > /tmp/container-homeassistant.service
   [Unit]
   Description=Home Assistant
   After=network-online.target

   [Service]
   Type=simple
   User=root
   PermissionsStartOnly=true
   ExecPreStart=/root/ha_system/bin/pip3 install --upgrade homeassistant
   ExecStart=/root/ha_system/bin/hass -c "/root/ha_data"

   [Install]
   WantedBy=multi-user.target
   EOF

   # Push the .service file into the container, and enable it
   lxc file push /tmp/container-homeassistant.service ha/etc/systemd/system/homeassistant.service
   lxc exec ha -- systemctl --system daemon-reload
   lxc exec ha -- systemctl enable homeassistant.service
   lxc exec ha -- systemctl start homeassistant.service

Now we can test it. The last command should start HA. The same command with 'stop' should gracefully stop HA. Restarting the container should gracefully stop HA, and then restart it automatically. Your web browser UI should pick up each stop and start. You did it!


Final Notes

Remember how you start without any HomeAssitant data to mount? Now that you have a running HA Core, you can save a set of data:

   lxc file pull ha/root/.homeassistant /somewhere/else/.homeassistant --recursive

And remember to clean up your mess when youare done:

   lxc stop ha
   lxc delete ha

Saturday, August 15, 2020

Installing Home Assistant Core in an LXD Container (Part 1)

I've been running HomeAssistant Core reliably in an LXD container for almost two years now, so it's probably time to start detailing how to do it.

This is a step-by-step example of how to do it for folks who aren't very familiar with LXD containers and their features.

Installing LXD (documentation)

If you haven't used LXD before, you need to install it (it's a Snap) and initialize it (tell it where the storage is located). The initialization defaults are sane, so you should not have problems.

   sudo snap install lxd
   sudo lxd init

Container Profile: Macvlan Networking (optional)

A macvlan profile is one easy way for the container to get it's IP address from the router instead of the host. This means you can use a MAC Address filter to issue a permanent IP address. This works on ethernet, but often not on wifi. You only need to set up this profile ONCE, and it's easiest to do BEFORE creating the container. Since the container doesn't exist yet, all of these commands are done on the Host.

   # Get the real ethernet device (enp3s5 or some such)
   ip route show default 0.0.0.0/0

   # Make mistakes on a copy
   lxc profile copy default lanprofile

   # Change nictype field to macvlan
   #  'eth0' is a virtual device, not a real eth device
   lxc profile device set lanprofile eth0 nictype macvlan

   # Change parent field to real eth interface
   lxc profile device set lanprofile eth0 parent enp3s5

Create the Container

Create a new container named 'ha'. This command is done on the Host.

   # Create the container named "ha"
   lxc launch -p lanprofile ubuntu:focal ha

   # Learn the container's IP address. Need this for the web browser. 
   lxc list | grep ha

   # Get a root shell prompt inside the container
   lxc shell ha

Initial Setup in the Container

Let's get a shell set up timezone and apt. These commands are done on the Container root prompt.


   // This is one way to set the timezone
   dpkg-reconfigure tzdata

   // Reduce apt sources to Main and Universe only
   cat <<EOF > /etc/apt/sources.list
   deb http://us.archive.ubuntu.com/ubuntu/ focal main universe
   deb http://us.archive.ubuntu.com/ubuntu/ focal-updates main universe
   deb http://security.ubuntu.com/ubuntu focal-security main universe
   EOF

   // Tweak: Remove openssh-server
   apt autoremove openssh-server

   // Populate the apt package database and bring the container packages up-to-date
   apt update
   apt upgrade
   
   // Install the python packages needed for HomeAssistant
   apt install python3-pip python3-venv

   # Setup the homeassistant venv in the root home dir (/root)
   # --system-site-packages allows the venv to use the many deb packages that are already
   #    installed as dependencies instead of donwnloading pip duplicates 
   python3 -m venv --system-site-packages /root

Install and Run HomeAssistant

Now we move into a virtual environment inside the container, build HomeAssistant, and give it a first run. If you try to build or run HomeAssistant outside the venv, it will fail with cryptic errors.

   // Activate the installed venv. Notice how the prompt changes.
   root@ha:~# source bin/activate
   (root) root@ha:~#
   
   // Initial build of HomeAssistant. This takes a few minutes.
   (root) root@ha:~# python3 -m pip install homeassistant

   // Instead of first build, this is where you would upgrade
   (root) root@ha:~# python3 -m pip install --upgrade homeassistant

   // Initial run to set up and test.
   (root) root@ha:~# hass

   // After a minute or two, open the IP Address (port 8123). Example: http://192.168.1.18:8123
   // Use the Web UI to shut down the application. Or use CTRL+C.

   // Exit the venv
   (root) root@ha:~# deactivate

   // Exit the container and return to the Host shell.
   root@ha:~# exit
   Host:~$


There's a lot more to talk about in future posts:

  • The systemd service that starts HomeAssistant at container startup.
  • Creating an LXD disk device to keep the HomeAssistant data in. If I rebuild the container for some reason, I can simply connect it to the data.
  • Adding a USBIP client. The Z-Wave controller is elsewhere in the building, and USBIP lets me control it like it's attached to the host. That also means adding a USB device to the container.
  • Collecting Host hearbeat statistics for the HomeAssistant dashboard, and pushing those into the container regularly.
  • Backing up and restoring HomeAssistant data and configurations.

Friday, August 14, 2020

LXD Containers on a Home Server

LXD Containers are very handy, and I use them for quite a few services on my home hobby & fun server. Here's how I set up my containers after a year of experimenting. Your mileage will vary, of course. You may have very different preferences than I do.

1. Networking:

I use macvlan networking. It's a simple, reliable, low-overhead way to pull an IP address from the network DHCP server (router). I set the IP address of many machines on my network at the router.

The container and server cannot communicate using TCP/UDP with each other. I don't mind that.

You only need to set up this profile once for all containers. Simply specify the profile when creating a new container.

   // 'Host:$' means the shell user prompt on the LXD host system. It's not a shell command

   // Learn the eth interface: enp3s5 in this example
   Host:$ ip route show default 0.0.0.0/0

   // Make mistakes on a copy
   Host:$ lxc profile copy default lanprofile

   // Change nictype field. 'eth0' is a virtual device, not a real eth device
   Host:$ lxc profile device set lanprofile eth0 nictype macvlan

   // Change parent field to real eth interface
   Host:$ lxc profile device set lanprofile eth0 parent enp3s5

   // Let's test the changes
   Host:$ lxc profile show lanprofile
     config: {}
     description: Default LXD profile  // This field is copied. Not really the default
     devices:
       eth0:                           // Virtual device
         nictype: macvlan              // Correct network type
         parent: enp3s5                // Correct real device
         type: nic
       root:
         path: /
         pool: containers-disk         // Your pool will be different, of course
         type: disk
     name: lanprofile


2. Creating a Container

Create a new container called 'newcon':

   Host:$ lxc launch -p lanprofile ubuntu:focal newcon
      // 'Host:$'        - user (non-root) shell prompt on the LXD host
      // '-p lanprofile' - use the macvlan networking profile
      // 'focal'         - Ubuntu 20.04. Substitute any release you like


3. Set the Time Zone

The default time zone is UTC. Let's fix that. Here are two easy ways to set the timezone: (source)

   // Get a root prompt within the container for configuration
   // Then use the classic Debian interactive tool:
   Host:$ lxc shell newcon
   newcon:# dpkg-reconfigure tzdata

   // Alternately, here's a non-interactive way to do it entirely on the host
   Host:$ lxc exec newcon -- ln -fs /usr/share/zoneinfo/US/Central /etc/localtime
   Host:$ lxc exec newcon -- dpkg-reconfigure -f noninteractive tzdata


4. Remove SSH Server

We can access the container from the server at anytime. So most containers don't need an SSH server. Here are two ways to remove it

   // Inside the container
   newcon:# apt autoremove openssh-server 
   
   // Or from the Host
   Host:$ lxc exec newcon -- apt autoremove openssh-server


5. Limit Apt sources to what the container will actually use

Unlike setting the timezone properly, this is *important*. If you do this right, the container will update itself automatically for as long as the release of Ubuntu is supported (mark your calendar!) If you don't get this right, you will leave yourself an ongoing maintenance headache.

   // Limit the apt sources to (in this example) main from within the container
   newcon:# nano /etc/apt/sources.list
         // The final product should look similar to:
         deb http://archive.ubuntu.com/ubuntu focal main           
         deb http://archive.ubuntu.com/ubuntu focal-updates main           
         deb http://security.ubuntu.com/ubuntu focal-security main 

   // Alternately, *push* a new sources.list file from the host.
   # Create the new sources.list file on the host in /tmp
   cat <<EOF > /tmp/container-sources.list
   deb http://us.archive.ubuntu.com/ubuntu/ focal main
   deb http://us.archive.ubuntu.com/ubuntu/ focal-updates main
   deb http://security.ubuntu.com/ubuntu focal-security main
   EOF
   
   // *Push* the file from host to container
   Host:$ lxc file push /tmp/container-sources.list newcon/etc/apt/sources.list


6. Install the Application

How you do this depends upon the application and how it's packaged.


7. Update Unattended Upgrades

This is the secret sauce that keeps your container up-to-date. First, let's look at a cleaned-up version of the first 20-or-so lines of /etc/apt/apt.conf.d/50unattended-upgrades inside the container:

                    What it says                             What it means
           ------------------------------------------      -----------------------
   Unattended-Upgrade::Allowed-Origins {
           "${distro_id}:${distro_codename}";              Ubuntu:focal
           "${distro_id}:${distro_codename}-security";     Ubuntu:focal-security
   //      "${distro_id}:${distro_codename}-updates";      Ubuntu:focal-updates
   //      "${distro_id}:${distro_codename}-proposed";     Ubuntu:focal-proposed
   //      "${distro_id}:${distro_codename}-backports";    Ubuntu:focal-backports
   };

...why, those are just the normal repositories! -security is enabled (good), but -updates is disabled (bad). Let's fix that. Inside the container, that's just using an editor to remove the commenting ("//"). From the host, it's a substitution job for sed:

   Host:$ lxc exec newcon -- sed "s\/\ \g" /etc/apt/apt.conf.d/50unattended-upgrades

Third-party sources need to be updated, too. This is usually easiest from within the container. See this post for how and where to update Unattended Upgrades with the third-party source information.


8. Mounting External Media

Some containers need disk access. A classic example is a media server that needs access to that hard drive full of disorganized music.

If the disk is available across the network instead of locally, then use plain old sshfs or samba to mount the network share in /etc/fstab.

If the disk is local, then first mount it on the Host. After it's mounted, use an lxd disk device inside the container. A disk device is an all-in-one service: It creates the mount point inside the container and does the mounting. It's persistent across reboots...as long as the disk is mounted on the host.

   // Mount disk on the host and test
   Host:$ sudo mount /dev/sda1 /media
   Host:$ ls /media
      books         movies       music

   // Create disk device called "media_mount" and test
   Host:$ lxc config device add newcon media_mount disk source=/media path=/Shared_Media
   Host:$ lxc exec newcon -- ls /Shared_Media
      books         movies       music

If the ownership of files on the disk is confused, and you get "permisson denied" errors, then use shiftfs to do the equivalent of remounting without suid

   Host:$ lxc exec newcon -- ls /Shared_Media/books
      permission denied

   // Enable shiftfs in LXD, reload the lxd daemon, and test
   Host$ sudo snap set lxd shiftfs.enable=true
   Host$ sudo systemctl reload snap.lxd.daemon
   Host$ lxc info | grep shiftfs
    shiftfs: "true"

   // Add shiftsfs to the disk device
   Host$ lxc config device set newcon media_mount shift=true

   Host:$ lxc exec newcon -- ls /Shared_Media/books
      boring_books       exciting_books        comic_books        cookbooks

Friday, May 8, 2020

Testing Ubuntu Core with Containers on VirtualBox

I want to try out Ubuntu Core to see if it's appropriate for running a small server with a couple containers.

The current OS is Ubuntu Server 20.04...but I'm really not using most of the Server features. Those are in the LXD containers. So this is an experiment to see if Ubuntu Core can function as the server OS.

Prerequisites: If you are looking to try this, you should already be familiar (not expert) with:
  • Using SSH
  • Using the vi text editor (Ubuntu Core lacks nano)
  • Basic networking concepts like dhcp
  • Basic VM and Container concepts


Download Ubuntu Core:
  • Create Ubuntu SSO Account (if you don't have one already)
  • Create a SSH Key (if you don't have one already)
  • Import your SSH Public Key to Ubuntu SSO.
  • Download an Ubuntu core .img file from https://ubuntu.com/download/iot#core
  • Convert the Ubuntu Core .img to a Virtualbox .vdi:

         me@desktop:~$ VBoxManage convertdd ubuntu-core-18-amd64.img ubuntu-core.vdi


Set up a new machine in VirtualBox:
  • Install VirtualBox (if you haven't already):

         me@desktop:~$ sudo apt install virtualbox

  • In the Virtualbox Settings, File -> Virtual Media Manager. Add the ubuntu-core.vdi
  • Create a New Machine. Use an existing Hard Disk File --> ubuntu-core.vdi
  • Check the network settings. You want a network that you will be able to access. I chose bridged networking so I could play with the new system from different locations, and set up a static IP address on the router. ENABLE promiscuous mode, so containers can get IP addresses from the router. Otherwise, VirtualBox will filter out the dhcp requests.
  • OPTIONAL: Additional tweaks to enhance performance.


Take a snapshot of your current network neighborhood:
  • Use this to figure out Ubuntu Core's IP address later on:
     me@Desktop:~$ ip neigh
     192.168.1.227 dev enp3s0 lladdr 00:1c:b3:75:23:a3 STALE
     192.168.1.234 dev enp3s0 lladdr d8:31:34:2c:b8:3a STALE
     192.168.1.246 dev enp3s0 lladdr f4:f5:d8:29:e5:90 REACHABLE
     192.168.1.213 dev enp3s0 lladdr 98:e0:d9:77:5d:6b STALE
     192.168.1.1 dev enp3s0 lladdr 2c:fd:a1:67:2a:d0 STALE
     fe80::2efd:a1ff:fe67:2ad0 dev enp3s0 lladdr 2c:fd:a1:67:2a:d0 router DELAY


Boot the image in VirtualBox:
  • The first boot of Ubuntu Core requires a screen and keyboard (one reason we're trying this in VirtualBox). Subsequent logins will be done by ssh.
  • Answer the couple setup questions.
  • Use your Ubuntu One login e-mail address.
  • The VM will reboot itself (perhaps more than once) when complete.
  • Note you cannot login to the VM's TTY. Ubuntu Core's default login is via ssh. Instead, the VM's TTY tells you the IP address to use for ssh.
  • Since we are using a VM, this is a convenient place to take an initial snapshot. If you make a mess of networking in the next step, you can revert the snapshot.


Let's do some initial configuration:
  • After the VM reboots, the Virtualbox screen only shows the IP address.

  • // SSH into the Ubuntu Core Guest
    me@desktop:~$ ssh my-Ubuntu-One-login-name@IP-address
     [...Welcome message and MOTD...]
    me@localhost:~$
    
    // The default name is "localhost"
    // Let's change that. Takes effect after reboot.
    me@localhost:~$ sudo hostnamectl set-hostname 'ubuntu-core-vm'
    
    // Set the timezone. Takes effect immediately.
    me@localhost:~$ sudo timedatectl set-timezone 'America/Chicago'
    
    // OPTIONAL: Create a TTY login
    // This can be handy if you have networking problems.
    me@localhost:~$ sudo passwd my-Ubuntu-One-login-name


Let's set up the network bridge so containers can draw their IP address from the router:

  • We use vi to edit the netplan configuration. When we apply the changes, the ssh connection will be severed so we must discover the new IP address to login again.

  • me@localhost:~$ sudo vi /writable/system-data/etc/netplan/00-snapd-config.yaml
    
         #// The following seven lines are the original file. Commented instead of deleted.
         # This is the network config written by 'console_conf'
         #network:
         #  ethernets:
         #    eth0:
         #      addresses: []
         #      dhcp4: true
         #  version: 2
    
         #// The following lines are the new config 
         network:
           version: 2
           renderer: networkd
    
           ethernets:
             eth0:
               dhcp4: no
               dhcp6: no
    
           bridges:
             # br0 is the name that containers use as the parent
             br0:
               interfaces:
                 # eth0 is the device name in 'ip addr'
                 - eth0
               dhcp4: yes
               dhcp6: yes
         #// End
         
    
    // After the file is ready, implement it:
    me@localhost:~$ sudo netplan generate
    me@localhost:~$ sudo netplan apply
    
    // If all goes well...your ssh session just terminated without warning.


Test our new network settings:
  • The Ubuntu Core VM window will NOT change the displayed IP address after the netplan change...but that IP won't work anymore.
  • If you happen to reboot (not necessary) you will see that the TTY window displays no IP address when bridged...unless you have created an optional TTY login.
  • Instead of rebooting, let's take another network snapshot and compare to earlier:

         me@Desktop:~$ ip neigh
         192.168.1.226 dev enp3s0 lladdr c6:12:89:22:56:e4 STALE
         192.168.1.227 dev enp3s0 lladdr 00:1c:b3:75:23:a3 STALE
         192.168.1.234 dev enp3s0 lladdr d8:31:34:2c:b8:3a STALE  <---- NEW
         192.168.1.235 dev enp3s0 lladdr DELAY                    <-----NEW
         192.168.1.246 dev enp3s0 lladdr f4:f5:d8:29:e5:90 REACHABLE
         192.168.1.213 dev enp3s0 lladdr 98:e0:d9:77:5d:6b STALE
         192.168.1.1 dev enp3s0 lladdr 2c:fd:a1:67:2a:d0 STALE
         fe80::2efd:a1ff:fe67:2ad0 dev enp3s0 lladdr 2c:fd:a1:67:2a:d0 router DELAY

  • We have two new lines: .226 and .235 One of those was the old IP address and one is the new. SSH into the new IP address, and you're back in.

    me@desktop:~$ ssh my-Ubuntu-One-user-name@192.168.1.226
    Welcome to Ubuntu Core 18 (GNU/Linux 4.15.0-99-generic x86_64)
     [...Welcome message and MOTD...]
    Last login: Thu May  7 16:11:38 2020 from 192.168.1.6
    me@localhost:~$

  • Let's take a closer look at our new, successful network settings.

    me@localhost:~$ ip addr
    1: lo: <LOOPBACK,UP,LOWER_UP> mtu 65536 qdisc noqueue state UNKNOWN group default qlen 1000
        link/loopback 00:00:00:00:00:00 brd 00:00:00:00:00:00
        inet 127.0.0.1/8 scope host lo
           valid_lft forever preferred_lft forever
        inet6 ::1/128 scope host
           valid_lft forever preferred_lft forever
    
    2: br0: <BROADCAST,MULTICAST,UP,LOWER_UP> mtu 1500 qdisc noqueue state UP group default qlen 1000
        link/ether c6:12:89:22:56:e4 brd ff:ff:ff:ff:ff:ff
        inet 192.168.1.226/24 brd 192.168.1.255 scope global dynamic br0
           valid_lft 9545sec preferred_lft 9545sec
        inet6 2683:4000:a450:1678:c412:89ff:fe22:56e4/64 scope global dynamic mngtmpaddr noprefixroute
           valid_lft 600sec preferred_lft 600sec
        inet6 fe80::c412:89ff:fe22:56e4/64 scope link
           valid_lft forever preferred_lft forever
    
    3: eth0: <BROADCAST,MULTICAST,UP,LOWER_UP> mtu 1500 qdisc fq_codel master br0 state UP group default qlen 1000
        link/ether 08:00:27:fd:20:92 brd ff:ff:ff:ff:ff:ff
    
    // Note that ubuntu-core-vm now uses the br0 address, and lacks an eth0 address.
    // That's what we want.


Set up static IP addresses on the Router and then reboot to use the new IP address.
  • Remember, the whole point of bridged networking is for the router to issue all the IP addresses and avoid doing a lot of NATing and Port Forwarding.
  • So now is the time to login to the Router and have it issue a constant IP address to the Bridge MAC address (in this case c6:12:89:22:56:e4). After this, ubuntu-core-vm (the Ubuntu Core Guest VM) will always have a predictable IP address.
  • Use VirtualBox to ACPI shutdown the VM, then restart it headless. We're looking for two changes: The hostname and the login IP address.
  • Starting headless can be done two ways:

    1. GUI: Virtualbox Start button submenu
    2. me@Desktop:~$  VBoxHeadless --startvm name-of-vm

  • Success at rebooting headless and logging into the permanent IP address is a good point for another VM Snapshot. And maybe a sandwich. Well done!


Install LXD onto ubuntu-core-vm:
  • Install:

    me@ubuntu-core-vm:~$ snap install lxd
    lxd 4.0.1 from Canonical✓ installed
    me@ubuntu-core-vm:~$

  • Add myself to the `lxd` group so 'sudo' isn't necessary anymore. This SHOULD work, but doesn't due to a bug (discussion)

    host:~$ sudo adduser --extrausers me lxd     // Works on most Ubuntu; does NOT work on Ubuntu Core even with --extrausers
    host:~$ newgrp lxd                           // New group takes effect without logout/login

  • Instead, edit the groups file directly using vi:

    // Use vi to edit the file:
    me@ubuntu-core-vm:~$ sudo vi /var/lib/extrausers/group
    
         // Change the lxd line:
         lxd:x:999:               // Old Line
         lxd:x:999:my-login-name  // New Line
    
    
    // Apply the new group settings without logout
    me@ubuntu-core-vm:~$ newgrp lxd
Configure LXD:
  • LXD is easy to configure. We need to make three changes from the default settings since we already have a bridge (br0) set up that we want to use.

    me@ubuntu-core-vm:~$ lxd init
    
    Would you like to use LXD clustering? (yes/no) [default=no]:
    Do you want to configure a new storage pool? (yes/no) [default=yes]:
    Name of the new storage pool [default=default]:
    Name of the storage backend to use (dir, lvm, ceph, btrfs) [default=btrfs]:
    Create a new BTRFS pool? (yes/no) [default=yes]:
    Would you like to use an existing block device? (yes/no) [default=no]:
    Size in GB of the new loop device (1GB minimum) [default=15GB]:
    Would you like to connect to a MAAS server? (yes/no) [default=no]:
    Would you like to create a new local network bridge? (yes/no) [default=yes]: no    <------------------------- CHANGE
    Would you like to configure LXD to use an existing bridge or host interface? (yes/no) [default=no]: yes   <-- CHANGE
    Name of the existing bridge or host interface: br0     <----------------------------------------------------- CHANGE
    Would you like LXD to be available over the network? (yes/no) [default=no]:
    Would you like stale cached images to be updated automatically? (yes/no) [default=yes]
    Would you like a YAML "lxd init" preseed to be printed? (yes/no) [default=no]:
    
    me@ubuntu-core-vm:~$
  • Next, we change the networking profile so containers use the bridge:

    // Open the default container profile in vi
    me@ubuntu-core-vm:~$ lxc profile edit default
    
         config: {}
         description: Default LXD profile
         devices:
           # Container eth0, not ubuntu-core-vm eth0
           eth0:
             name: eth0
             nictype: bridged
             # This is the ubuntu-core-vm br0, the real network connection
             parent: br0
             type: nic
           root:
             path: /
             pool: default
             type: disk
         name: default
         used_by: []
  • Add the Ubuntu-Minimal stream for cloud-images, so our test container is small:

    me@ubuntu-core-vm:~$ lxc remote add --protocol simplestreams ubuntu-minimal https://cloud-images.ubuntu.com/minimal/releases/
Create and start a Minimal container:
    me@ubuntu-core-vm:~$ lxc launch ubuntu-minimal:20.04 test1
    Creating test1
    Starting test1
    
    me@ubuntu-core-vm:~$ lxc list
    +-------+---------+----------------------+-----------------------------------------------+-----------+-----------+
    | NAME  |  STATE  |         IPV4         |                      IPV6                     |   TYPE    | SNAPSHOTS |
    +-------+---------+----------------------+-----------------------------------------------+-----------+-----------+
    | test1 | RUNNING | 192.168.1.248 (eth0) | 2603:6000:a540:1678:216:3eff:fef0:3a6f (eth0) | CONTAINER | 0         |
    +-------+---------+----------------------+-----------------------------------------------+-----------+-----------+
    
    
    // Let's test outbound connectivity from the container
    me@ubuntu-core-vm:~$ lxc shell test1
    root@test1:~# apt update
    Get:1 http://archive.ubuntu.com/ubuntu focal InRelease [265 kB]
    [...lots of succesful server connections...]
    Get:26 http://archive.ubuntu.com/ubuntu focal-backports/universe Translation-en [1280 B]
    Fetched 16.3 MB in 5s (3009 kB/s)
    Reading package lists... Done
    Building dependency tree...
    Reading state information... Done
    5 packages can be upgraded. Run 'apt list --upgradable' to see them.
    root@test1:~#

Wednesday, February 19, 2020

Pushing a file from Host into an to LXD Container

One of the little (and deliberate) papercuts of using unprivileged LXD containers is that unless data flows in from a network connection, it likely has the wrong owner and permissions.

Here are two examples in the HomeAssistant container.

1. The HA container needs to talk to a USB dongle elsewhere in the building. It does so using USBIP, and I discussed how to make it work in this previous post.

2. I want the HA container to display some performance data about the host (uptime, RAM used, similar excitements). Of course, it's a container, so it simply cannot do that natively without using lots of jiggerypokery to escape the container. Instead, a script collects the information and pushes the information into the container every few minutes.

     $ sudo lxc file push /path/to/host/file.json container-name/path/to/container/

Easy enough, right.

Well, not quite. Home Assistant, when installed, creates a non-root user, and puts all of it's files in a subdirectory. Add another directory to keep things simple, and you get:

     /home/homeassistant/.homeassistant/external_files/

And, unfortunately, all those subdirectories are owned by a non-root user. So lxc cannot 'push' all the way into them (result: permission error).

    -rw-r--r-- 1   root root  154 Feb 19 15:34 file.json

The pushed file can only be pushed to in the wrong location, and gets there with the wrong ownership.


Systemd to the rescue: Let's create a systemd job on the container that listens for a push, then fixes the location and the ownership.

The feature is called a systemd.path.

Like a systemd timer it consists of two parts, a trigger (.path) and a service that gets triggered.

The .path file is very simple. Here's what I used for the trigger:

[Unit]
# /etc/systemd/system/server_status.path
Description=Listener for a new server status file

[Path]
PathModified=/home/homeassistant/.homeassistant/file.json

[Install]
WantedBy=multi-user.target

The service file is almost as simple. Here's what I used:

[Unit]
# /etc/systemd/system/server_status.service
Description=Move and CHOWN the server status file

[Service]
Type=oneshot
User=root
ExecStartPre=mv /home/homeassistant/.homeassistant/file.json /home/homeassistant/.homeassistant/external_files/
ExecStart=chown homeassistant:homeassistant /home/homeassistant/.homeassistant/external_files/file.json

[Install]
WantedBy=multi-user.target

Finally, enable and start the path (not the service)

sudo systemctl daemon-reload
sudo systemctl enable server_status.path
sudo systemctl start server_status.path


Sunday, February 2, 2020

Advanced Unattended Upgrade (Ubuntu): Chrome and Plex examples

Updated Aug 26, 2020

This is a question that pops up occasionally in various support forums:

Why doesn't (Ubuntu) Unattended Upgrades work for all applications? How can I get it to work for my application?

Good question.

Here is what happens under the hood: The default settings for Unattended Upgrades are for only packages in the "-security" pocket of the Ubuntu repositories.

Not "-updates", not "-backports", not "-universe", not any third-party repositories, not any PPAs. Just "-security".

This is a deliberately conservative choice -- while the Ubuntu Security Team keeps it's delta as small as possible, it's a historical fact that even small security patches have (unintentionally) introduced new bugs.


Here's how you can override that choice. 

Let's take a look at the top section of file /etc/apt/apt.conf.d/50unattended-upgrades, and focus on the "Allowed-Origins section." It's edited for clarity here:

Unattended-Upgrade::Allowed-Origins {
     "${distro_id}:${distro_codename}";
     "${distro_id}:${distro_codename}-security";
//   "${distro_id}:${distro_codename}-updates";
//   "${distro_id}:${distro_codename}-proposed";
//   "${distro_id}:${distro_codename}-backports";
};

There, you can see the various Ubuntu repo pockets.

You can also see that most of the options are commented out (the "//"). If you know how to use a basic text editor and sudo, you can safely change those settings. Warning: You can break your system quite horribly by enabling the wrong source. Enabling "-proposed" and other testing sources is a very bad idea.


How to add the -updates pocket of the Ubuntu Repos?

I've done this for years, BUT (this is important) I don't add lots of extra sources. Simply uncomment the line.

   "${distro_id}:${distro_codename}-updates";

That's all. When Unattended Upgrades runs next, it will load the new settings.

Bonus: Here's one way to do it using sed:

   sed -i 's~//\(."${distro_id}:${distro_codename}-updates";\)~\1~' /etc/apt/apt.conf.d/50unattended-upgrades


How to add the -universe pocket of the Ubuntu Repos?

You can create a '-universe' line like the others, but it won't do anything. It's already handled by the "-updates" line.


How to add a generic new repository that's not in the Ubuntu Repos?

Add a line in the format to the end of the section:

    //    "${distro_id}:${distro_codename}-backports";
    "origin:section"       <-------- Add this format
    };

The trick is finding out what the "origin" and "section" strings should be.

Step 1: Find the URL of the source that you want to add. It's located somewhere in /etc/apt/sources.list or /etc/apt/sources.list.* . It looks something like this...

    deb http://security.ubuntu.com/ubuntu eoan-security main restricted universe multiverse
      ...or...
    deb [arch=amd64] http://dl.google.com/linux/chrome/deb/ stable main
      ...or...
    deb https://downloads.plex.tv/repo/deb/ public main

Step 2: Find the corresponding Release file in your system for the URL.

    http://security.ubuntu.com/ubuntu eoan-security
      ...becomes...
    /var/lib/apt/lists/security.ubuntu.com_ubuntu_dists_eoan-security_InRelease


    http://dl.google.com/linux/chrome/deb/ stable
      ...becomes...
    /var/lib/apt/lists/dl.google.com_linux_chrome_deb_dists_stable_InRelease


    https://downloads.plex.tv/repo/deb/ public
      ...becomes...
    /var/lib/apt/lists/downloads.plex.tv_repo_deb_dists_public_Release

Step 3: Use grep to find the "Origin" string.

    $ grep Origin /var/lib/apt/lists/security.ubuntu.com_ubuntu_dists_eoan-security_InRelease
    Origin: Ubuntu

    $ grep Origin /var/lib/apt/lists/dl.google.com_linux_chrome_deb_dists_stable_InRelease
    Origin: Google LLC

    $ grep Origin /var/lib/apt/lists/downloads.plex.tv_repo_deb_dists_public_Release
    Origin: Artifactory

Step 4: With the Origin string and Section (after the space in the URL), we have all the information we need:

    "Ubuntu:eoan-security"
       ...or...
    "Google LLC:stable"
       ...or...
    "Artifactory:public"

You're ready to add the appropriate string to the config file.

Bonus: Here's one way to isolate most of these using shell script

    package="google-chrome-stable"
    url=$(apt-cache policy $package | grep "500 http://")
    var_path=$(echo $url | sed 's~/~_~g' | \
           sed 's~500 http:__\([a-z0-9._]*\) \([a-z0-9]*\)_.*~/var/lib/apt/lists/\1_dists_\2_InRelease~')
    origin=$(grep "Origin:" $var_path | cut -d" " -f2)
    section=$(echo $url | sed 's~500 http://\([a-z0-9._/]*\) \([a-z0-9]*\)/.*~\2~')
    echo "$origin":"$section"

Step 5: Run Unattended Upgrades once, then check the log to make sure Unattended Upgrades accepted the change.

    $ sudo unattended-upgrade
    $ less /var/log/unattended-upgrades/unattended-upgrades.log   (sometimes sudo may be needed)

You are looking for a recent line like:

    2020-02-02 13:36:23,165 INFO Allowed origins are: o=Ubuntu,a=eoan, o=Ubuntu,a=eoan-security, o=UbuntuESM,a=eoan, o=UbuntuESM,a=eoan-security, o=UbuntuESM,a=eoan-security

Your new source and section should be listed.


Summary for folks who just want to know how to update Chrome (stable)

  1. Edit (using sudo and a text editor) the file /etc/apt/apt.conf.d/50unattended-upgrades
  2. In the section "Unattended-Upgrade::Allowed-Origins {", add the following line BEFORE the final "};"
    "Google LLC:stable"


Summary for folks who just want to know how to update Plex

  1. Edit (using sudo and a text editor) the file /etc/apt/apt.conf.d/50unattended-upgrades 
  2. In the section "Unattended-Upgrade::Allowed-Origins {", add the following line BEFORE the final "};"
    "Artifactory:public"